Wednesday, July 11, 2007

Trash to Treasure


Well this is a small piece I got from the thrift store for $0.50. I drilled holes in the bottom, put soil in it, and planted a few marigold seeds. Next year I will put something better in it.

A Potter's Bench


So this is my potter's bench. I made this about 2 months ago on a hot Saturday. It turned out great and wasn't too hard to make. The best part is that it was free to make.

The brown wood you see is all from an old fence that a local fence company tore down. The 2 x 4s are the cross pieces from the fence. The 1x6 on the counter top there I got out of a dumpster on a construction site. The 1x4 slats on the top shelf like unit are cedar shutter material I got from the dumpster at a construction site as well. The metal straps that hold the top unit to the bottom are left over braces for stair railings and posts in a house. The screws are all leftovers from a construction site too. Anyway, I use this bench to store my garden things, add flavor and character to my garden, pot plants on, mix fertilizer or other garden chemicals I need, etc. It's been a great addition and I love having it. Eventually I will get time to actually place the pavers in front of it, in the ground properly.

Wednesday, June 20, 2007

Metal Containers


Metal Containers are great cause they can vary so much in shape, size, color, style, and finish. Here are two simple examples. Neither of these was intended for outdoor plants. The top one was a simple galvanized tin bucket used for decoration. Put a few holes in it and it is a planter. The ice plant does well in this one. I would probably choose a different plant next time for this planter, but it works.

The bottom one here was intended to be an indoor container that you can put either fake plants in or place a separate plastic pot inside. I liked it for an outdoor planter, so again, I put a few holes in it and planted.

Containers like these can be bought at thrift stores for almost nothing.

Sunday, June 17, 2007

Decorative Rocks...a new use


This is my neighbor's yard. She recently re-did her front and wanted to put some kind of border in. I had recently collected some decorative rock from a construction site that was going to be thrown away. This rock is used for the exterior of the home.

The back side of the rock is flat, so it is easy to place in the ground. The top is nice and natural looking. It ended up looking pretty good here in her garden. I would have done it a bit different, but that's why it's her garden and not mine.

Either way, a nice re-use of a material and it was cheap. The rock is nice cause it weathers extremely well - it is made for the exterior of the home, so it handles cold, hot, wet, etc well. One thing it does not like is contact - what I mean is that the color rubs off if it is walked on or rubbed with another hard object. So, not a great material for a walk way, but as a decorative material, it is quite nice.

It is also easy to find and cheap. You can go to almost any home being built
where they are installing rock and ask them to leave the extra for you instead of throwing it away. There are lots of different styles, colors, etc, so look for one you like. Also, you can call the exterior company and ask them ahead of time.

Slip cover


This is an easy to make and easy to use container cause it is simply a container slip cover. It looks great at a slight height cause you can't see the plastic pot inside it. I built this using some old fence planks. I made it large enough to fit a pot so I could place in it whatever pot I wanted to without having to re-pot the plant and mix my own soil.

Clematis and Trellis


This is my clematis plant in the front yard. It is growing nicely and I am excited to see it bloom this summer with many small white flowers. I built this trellis last summer when I planted it and already need to extend it. I made the trellis out of redwood stakes you can buy at a local garden store such as Home Depot. I used copper wire to tie the crossing points and cut the bottom stakes so they would slide in the soil better. I can easily add to the trellis by building a new section that is identical and tying it to the old one. I also need to extend the trellis to the side a little as well to help the plant spread out a bit and not clump too much ( I don't want a thick bush here, but a nice spreading background of color for my yard).

Updated Hens and Chicks


So the Hens and Chicks have really taken over their container. It is about time to divide them (to happen soon). They have really looked beautiful this year. The large Hen in front here is finally about to bloom. I will need to work on this container soon to make sure it stays healthy and thin it a bit.

Finished Log Planter

Here is the log planter, all planted. This picture was taken after the planter had an unfortunate spill inside the car on the way to Mom and Dad's house (it was a gift to them). In this planter is, from left to right, Lamium, Stonecrop, Woolley Thyme x2, Stone Crop, and Woolley Thyme.
The soil is a well draining soil made of sand, garden soil (loam), some compost, and fine gravel. The Lamium is is a deeper hole and in softer, more decomposed wood - it needs the more nutrient rich environment of the decomposing wood.

Wednesday, May 23, 2007

Basket Planters


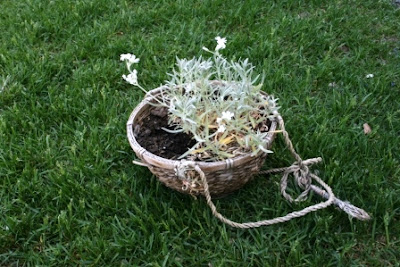
Here is an example of some basket planters. These are super easy to make and work well as planters. You can pick up cheap baskets from thrift stores (.50 cents to $1). Two of these were meant for plants and one was a former picnic basket. The top one here was originally just a cover for a pot, but it was easy to convert to a planter itself. The second was a hanging basket, but looked pretty good on the ground. The last was the picnic basket. Not too many modifications have to be made here as they work pretty well as is and have built in drainage.

The important thing is to make sure the basket isn't too deep for the plants. In deep ones, I placed crushed brick pieces to take up space in the bottom, to add a little weight, and to not waste soil that wouldn't be used by the plants intended for the basket.

Another item to remember is to make sure you water these well, according to the plant needs. Baskets lose water easier than other containers due to the obvious - holes/spaces. This means your soil can really dry out fast on these. However, if you stay on top of it, they do great. The middle one is a drought tolerant plant and was planted last year. It survived a very cold winter as well. The bottom one here has some miniature marigolds planted (from seed) around the base to fill in the space and add color. We'll see how they turn out.

Sunday, May 20, 2007

Taco Time

This container is actually a taco shell warmer you can buy in a local grocery store for about $2. The depth and shape of the container is nice, the
design is simple, and it was easy to turn into a planter.

To do this, take the lid, remove the handle at the top of the lid with a utility knife, and then turn the lid upside down. The bottom of the container fits just right into the lid and the whold thing rests quite stable on it. Don't forget to drill holes in the bottom of the container so water can get out.
Lastly, you can remove the lid to get rid of excess water or just tip the container a round a bit to let the water drip out the hole where the handle was.

In this container you are looking at chives. Not a great display of them, but we are still learning how to grow herbs (expanding our horizons beyond ornimentals).

Log Planter


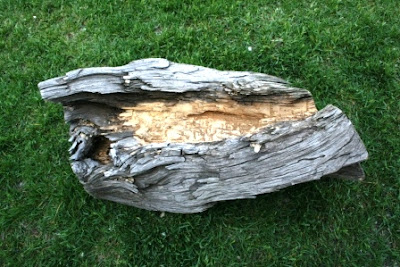
While rummaging around an old barn in Pleasant Grove, Utah, we found a large pile of old logs. This included the stump already posted on this site and some beautifully aged logs such as this one. Slowly we have been getting to them, carefully digging them out and preparing them for plants. This one is almost done. There is just a little more work needed to dig out the left side to make it deep enough for the plants we have in mind.

The pattern we have chosen here for planting simply follows a natural flow of the wood and is just a deeper version of what was already there. The whole thing was done in about 2 hours with chisels. Not too hard.

We will not need to add drainage hole to this log since there is a natural drainage flow to the right side and since the plants and soil to be placed in here will already be high drainage and low water content.

The top picture shows how the natural lay of the log is. Most likely, rock garden friendly plants will go in this planter. However, wooley thyme would look great in it too. The key is to select plants that will live in the rougher soil conditions and be low lying. The design of the log wouldn't look too good with plants that reach too high. Plants that will spread out a bit and maybe hang over the edge will look great. We'll see how it turns out.

Friday, May 11, 2007

Rusted Can

Rusted cans are easy to find and easy to use. This one is a larger can (not soup can size - more like a taller version of the larger fruit cans) and is great for the right plant.
You can easily drill holes in the bottom for drainage and not much else needs to be done. This one was used (picture to come later) to plant a small tree in. Seriously, a tree. I will have to explain later.

Antique Cherry Bucket

This container took a while to find a garden use because we weren't sure how to seal up the bottom to carry soil. However, with some neighborly inspiration, we found an awesome use for one.

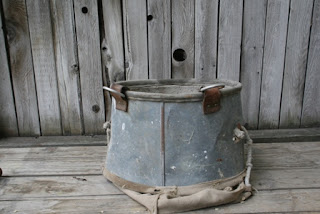
We picked up a few of these old buckets on an old orchard on West Mountain, Utah. The rings you see would have a strap attached to it that hung on your shoulder. The canvas you see on the bottom is a bag that could be let out by the small rope on the side to be bigger as you threw more cherries into it. The sides are padded with a foam pad to prevent brusing as the cherries were threw in.

What we did with this (I will try to get pictures when I can), was to cut the bag off and just plainly set the container in the ground about 3-4 inches. Then we filled the container with soil and planted daffodils in it. The resulting array of flowers all sprouting out the top was a stunningly beautiful rustic setting for the garden. And, there was no need to seal the bottom (thank heavens)

Old Conveyor Belt


These were a very nice "find" in Plymouth, Utah. These are actually sections of an old grain elevator belt. We found this barn fallen down and this long belt laying in a concrete hole at the bottom. These old scoops connected to the heavy cloth belt would carry wheat from the hole in which it was dumped, up to the top of the grain barn and dump it in.

We took the 100' long belt, cut it into sections of 2-3 scoops, placed the grommet in the top of each section, and then drilled holes in the bottom for drainage.

These work great for a number of plants, but best for plants that thrive in dry conditions. They can dry out quickly due to the metal exterior and the shallower depth, but if you keep the plants watered each day, they perform great and provide a beautiful rustic look for your garden.

Barn Wood

If you are lucky enough to have access to some old barnwood (especially from Western states), you can find some beautiful weathered wood that still has plenty of use in it.

This wood came from a 100 yr old barn in Holden, Utah. The screws used for the container were reclaimed from an old barn in Tremonton, Utah. The whole container was made from one plank of 1" x 12" wood (including the bottom piece).

Barn wood in the Western U.S. is beautiful because the pine weathered very nicely in the dry air and hot sun. The rustic look was perfect setting for this planting of Hens and Chicks. This is last year's picture and this year the plant has almost filled the top with beautiful blooms and vivid colors.

This is a deeper container, so we filled a few inches of the bottom with crushed brick (you can use small pebbles, crushed terra cotta pots, or even styrofoam pieces to fill some of the space and create nice drainage. On the top of the soil, we placed about an inch of fine sand to keep the top dry - this helps the leaves keep from rotting and other water damage. Plus, the sand was a nice aesthetic addition.

Another nice feature of this planter is the feet it rests on. We used reclaimed screws for feet. This way, we could adjust (by loosening or tightening) the feet for any uneven surface and keep the container off the ground while not taking away from the beauty of the box.

Old Fences

Another great material to use to make planters with is old fence wood. This planter was made of less than one full plank of fence wood. This fence had been painted the brown color you see and got the nice rustic finish over time of weathering.

Long after the fence is no good, the cedar wood will serve as a planter well (cedar is rot and pest resistant). Also, the size of the fence planks (1" x 4") is a very useable one.

Local fence companies will often let you rummage through their dumpsters for old fences they tear out (some will even leave it out for you to haul off). This planter was simple enough to make, with a few simple cuts for the side pieces, a few cuts for the bottom, and some small nails. On this one, a simple nail and hammer was used. Finish nails with a nail gun is easier, but sometimes the nail heads add to the look (esp as they rust some over time). Just depends on your available tools and taste.

On the bottom there are two small strips of wood that keep the bottom off the ground. We also placed a small bit of burlap netting on the bottom and some small holes were drilled for drainage. Pretty easy.

Some people don't like the fresh cut edges, but they will weather soon enough over time and they give a fun color contrast that doesn't bother most. If you want the brown, older edge only, just make sure you alternate inside and outside with your side pieces and use end cuts from the fence planks.

An Old Stump

Don't assume some dead plant can't be great for a live one. This is an old stump we reclaimed from a pile of wood that had been weathering on an old farm for years.

The keys to turning an old log/stump into an attractive, functional planter is to first choose one that has a great aesthetic to it (coloring, shape, etc) and secondly, will adequately support the space needed for planting. This one turned out great - it was a very nice find!

We cut the roots flat so it would lay on the ground nicely, dug out the center of the stump for planting, and drilled some holes through the bottom to provide some drainage.

The plant is Lamium and although it does better in shadier places, this stump provides the nutrient rich environment it likes. This plant, as you can see, is doing just fine in the hot, full, afternoon sun. Just make sure you water it often. Lamium doesn't like dry soil.

Welcome

Welcome to Garden Bugs. We hope you enjoy the ideas and products you find on this site. We can custom create containers, structures, and designs to your needs. The thngs you see here are only a sample of what we are able to do. Don't be afraid to call or send us a message to ask about ideas, products, or to make suggestions. Our philosphy is to "choose great materials, do something interesting, make something beautiful, and don't underestimate the importance of functionality."

Let us know if there is anything we can do to help you enjoy your garden.

Garden Bugs
(801) 787-1630